Table of Contents
This post walks through setting up STM32 development environment on Arch Linux and will guide you to blink a LED with C++.
Materials you need
Besides a PC, you will also need a STM32 board to run programs and a STLink or other tools to flash programs.
If you want to reproduce the blink project, you may also need jumper wires, a breadboard, resistors, and an LED.
Install necessary packages
Install toolchain for building, compiling and flashing STM32 programs.
sudo pacman -S arm-none-eabi-gcc arm-none-eabi-newlib arm-none-eabi-binutils stlink openocd gdb-arm-none-eabi cmake ninja clangdInstall stm32cubemx for project configuration and generation.
paru -S stm32cubemxCreate your project with STM32CubeMX
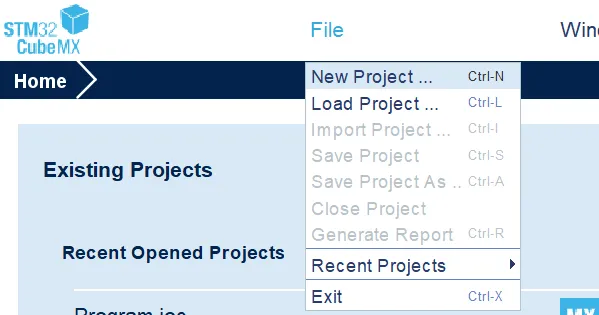
Launch STM32CubeMX, Click File - New Project to create a new project,
and input your board’s Commercial Part Number to search for your MCU,
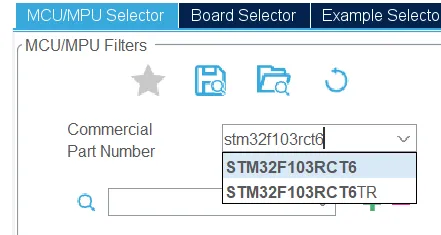
for example, I used stm32f103rct6.
Then choose the right one and click Start Project.
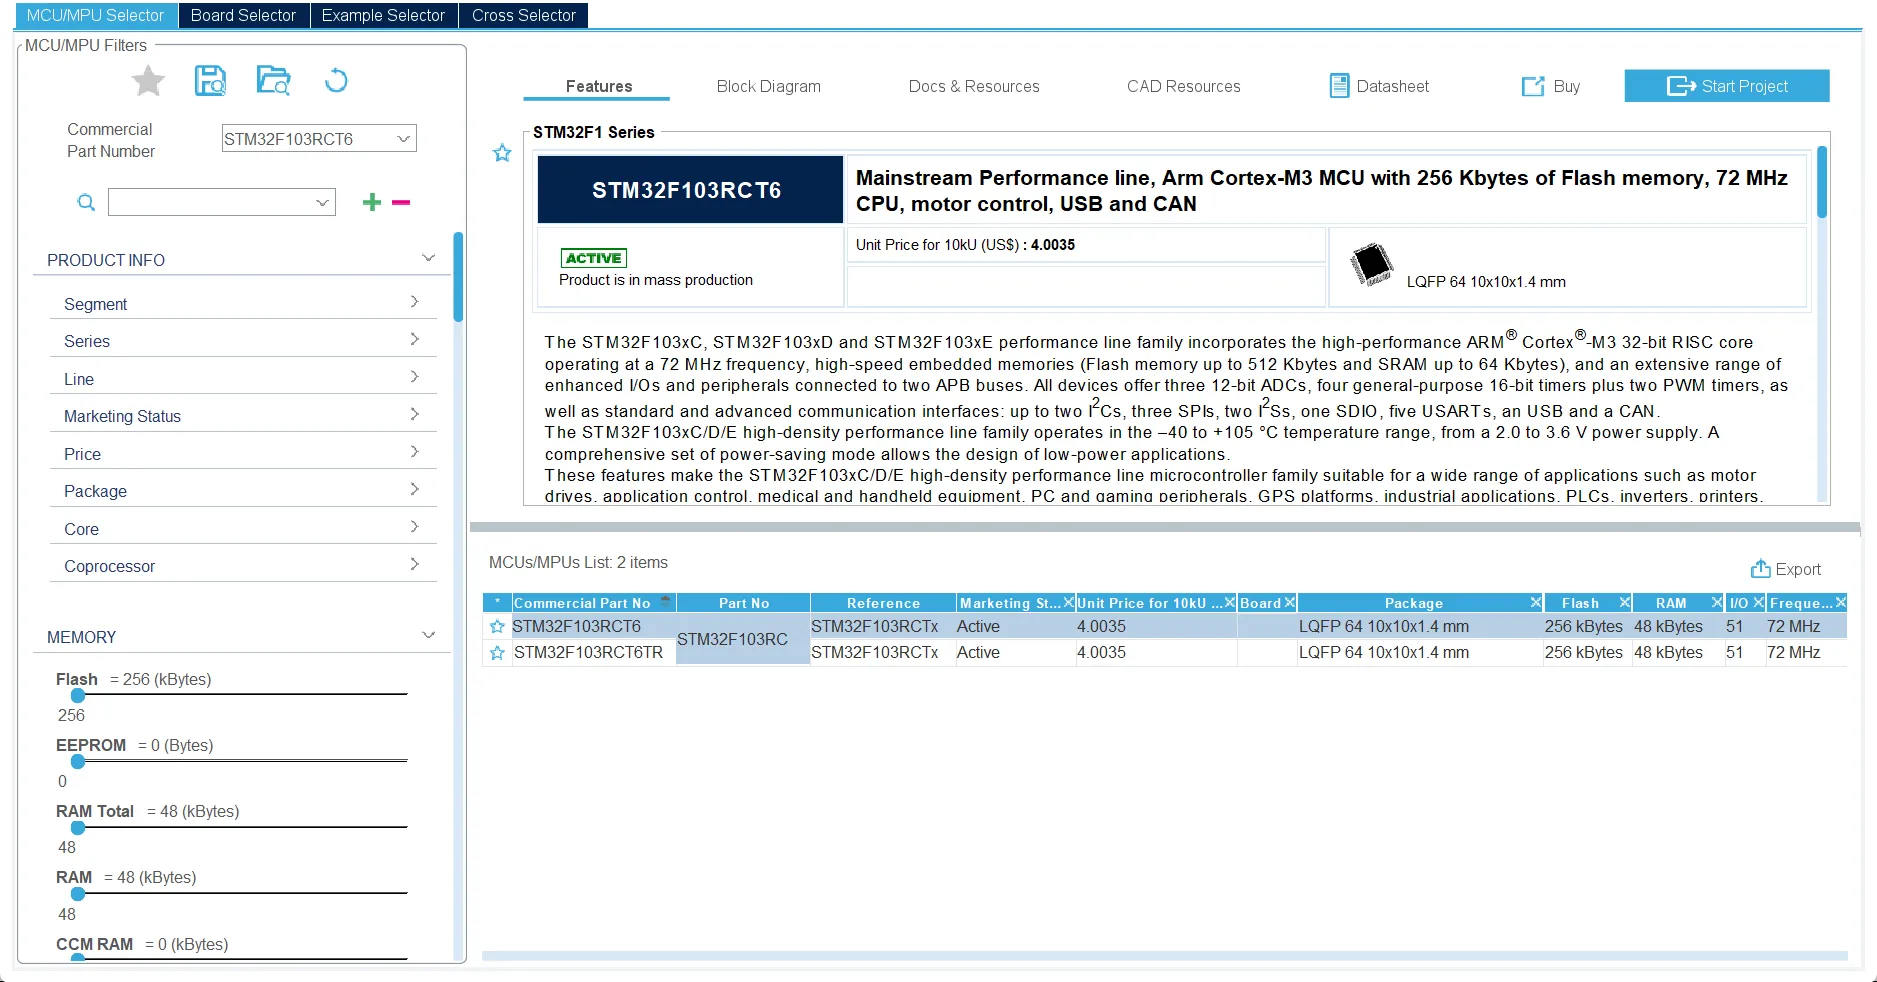
Your STM32CubeMX should display some information like this.
Now you can see a diagram of your MCU’s pinout, and therefore you can config them conveniently.
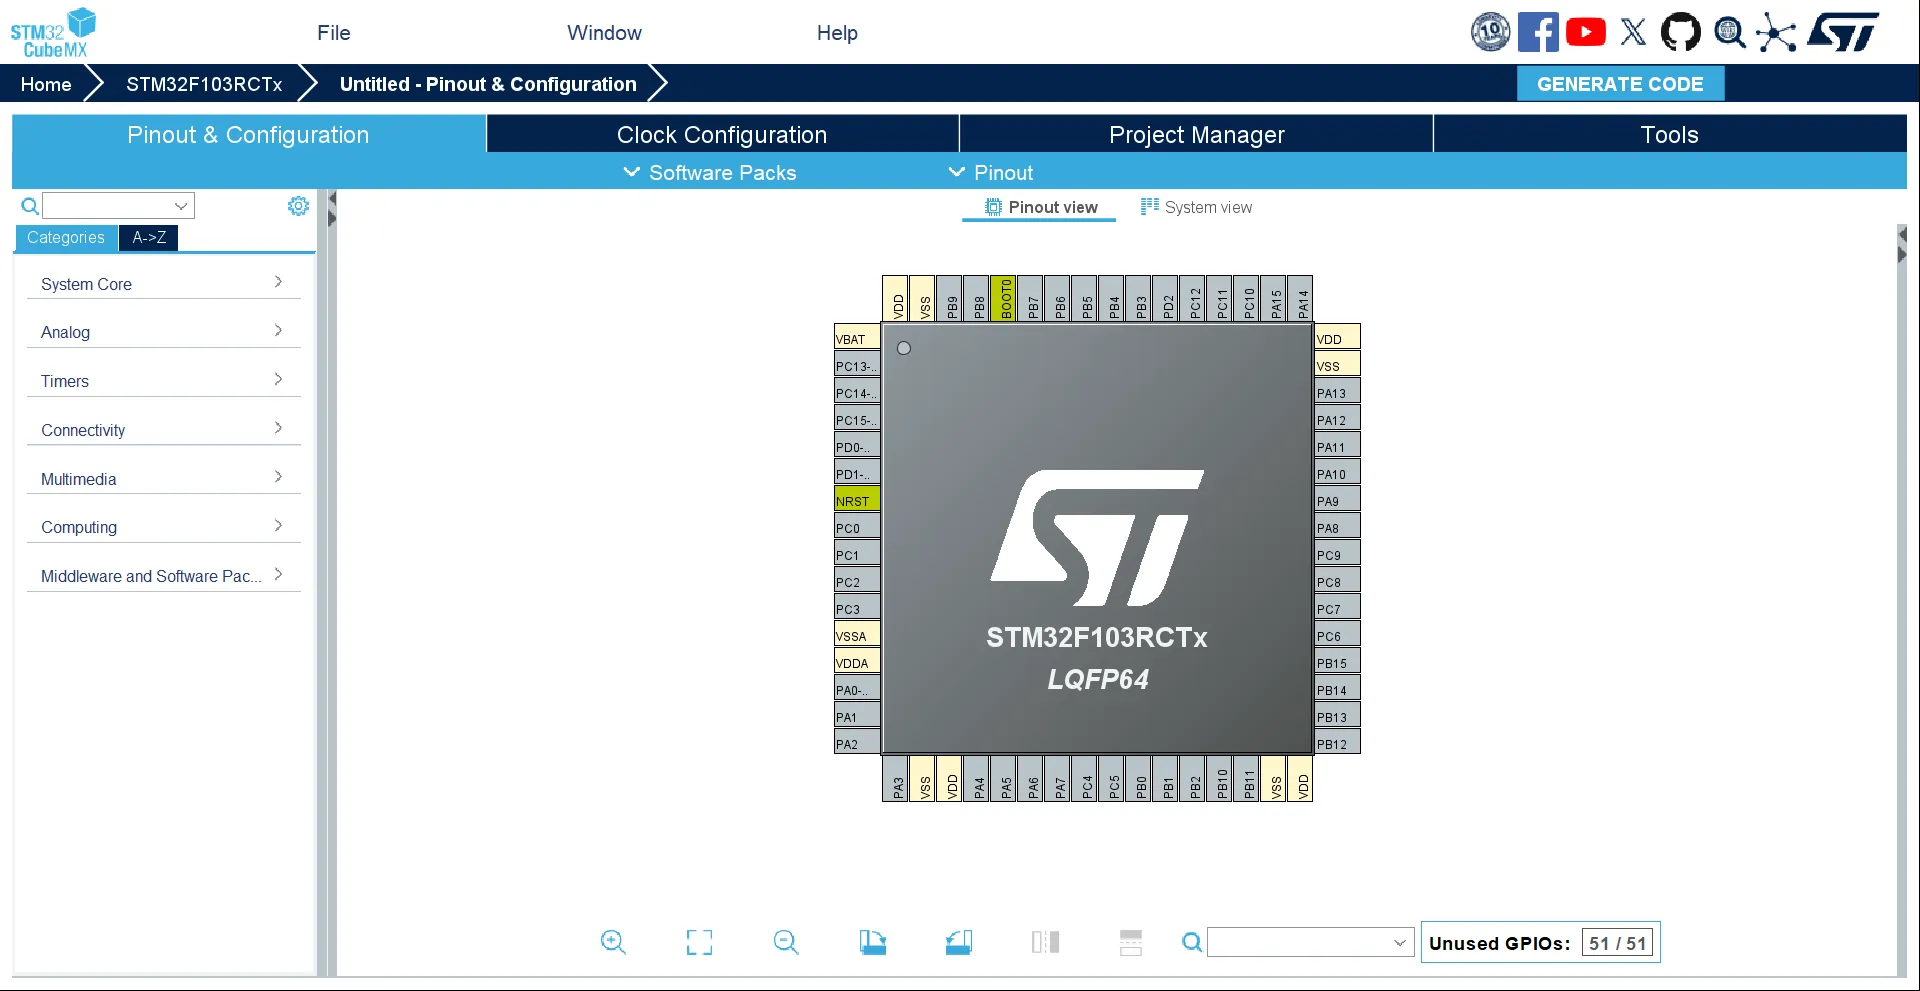
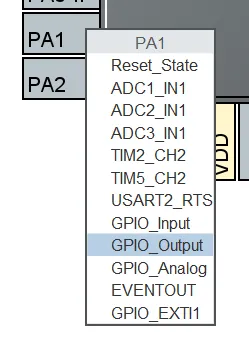
For example, since we want to blink an LED, I choose to use PA1 because there is an LED on my board connected with it. You can choose a proper one for your situation. Now you can click on the pin in the diagram and select GPIO_Output in the popup menu to use it as a GPIO output.
Then you can right click it and click Enter User Lable,
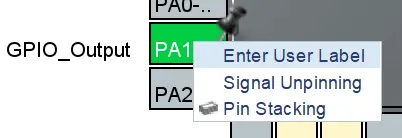
and input LED_1. A user lable will help you get a clear definition in your code generated in the project and therefore you can use it conveniently.

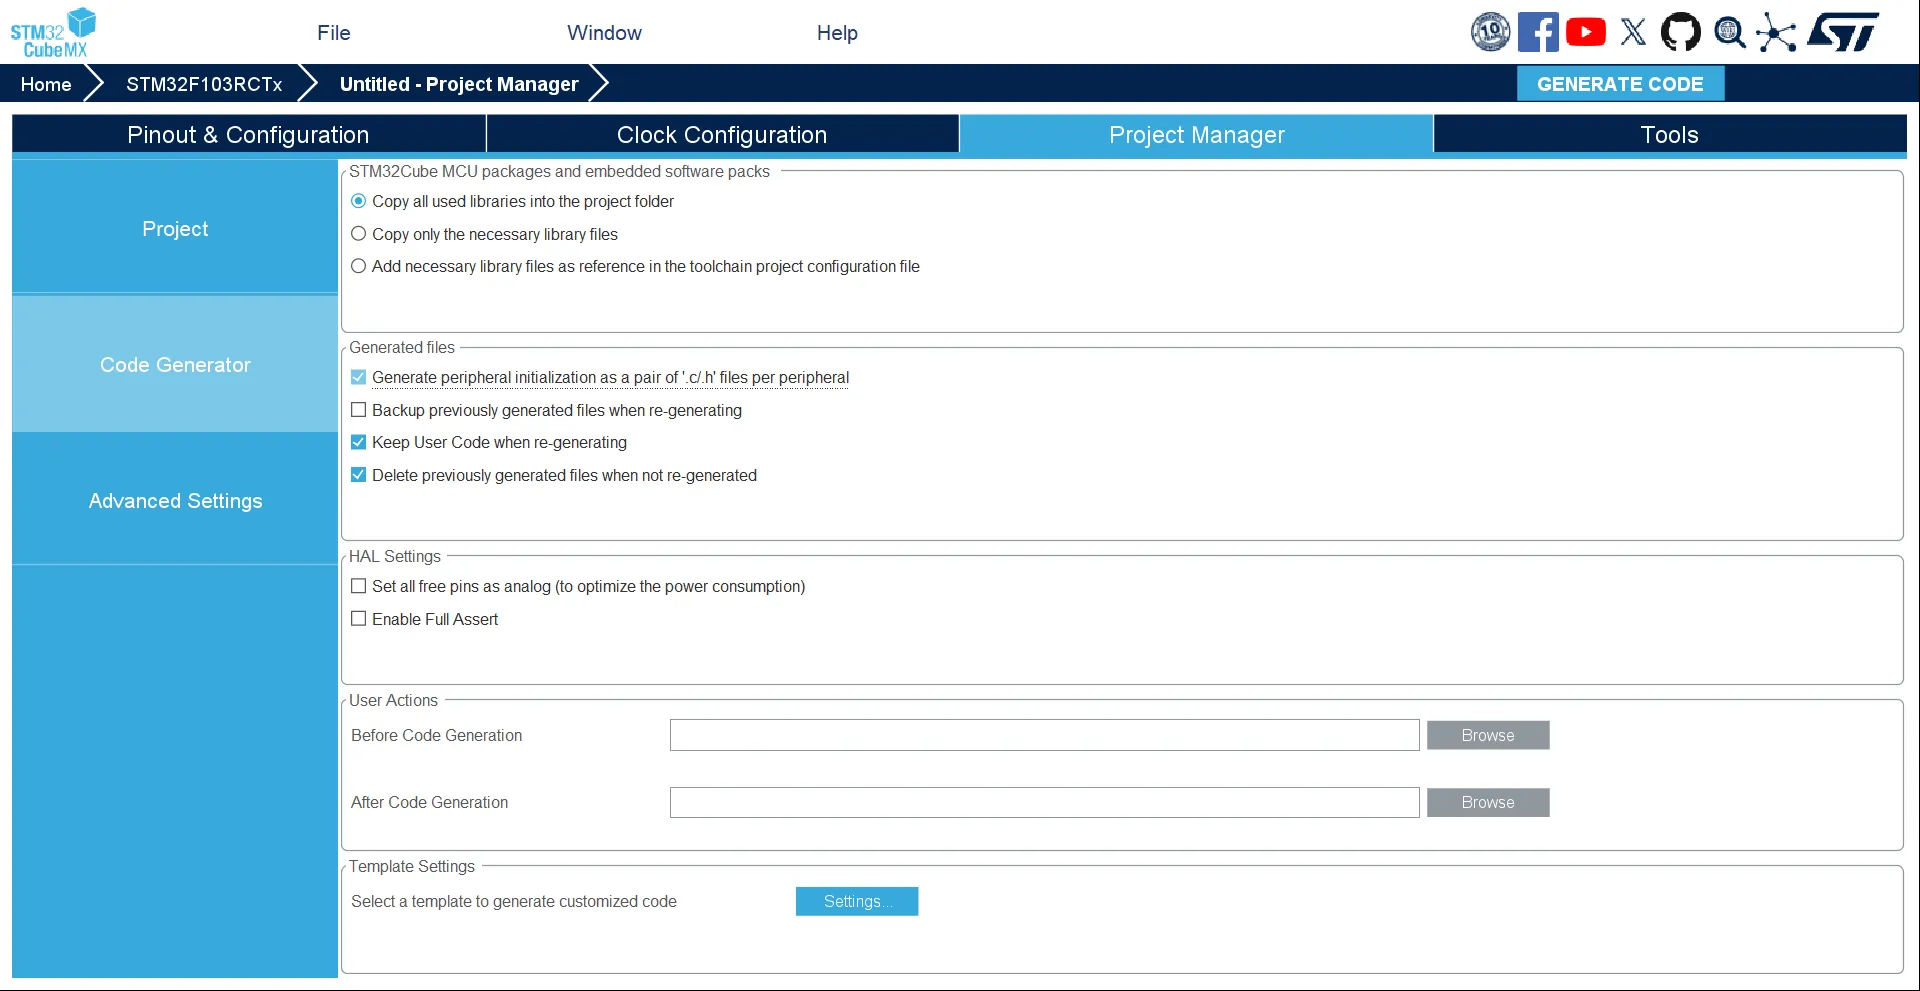
After completing configuration, go to the Project Manager tab, fill in the basic information including Project Name, Project Location. Then choose CMake as your Toolchain/IDE. Here we just keep the Default Compiler/Linker as GCC. Now go to the Code Generator section, set Generate peripheral initialization as a pair of '.c/.h' files per peripheral to true.

If you set everything correctly, your interface should be similar to the screenshots.
Once everything is configured, you can click GENERATE CODE button and generate your project. Then you can use Neovim to open the project and start coding.
Enable C++
If you, like me, are a C++ fan or feel it sick to use C to build a complex project, you may want to enable C++. Fortunately, here’s the way:
cd /path/to/your/project/nvim CMakeLists.txtAdd these:
#...set(CMAKE_CXX_STANDARD 20)set(CMAKE_CXX_STANDARD_REQUIRED ON)set(CMAKE_CXX_EXTENSIONS OFF)#...enable_language(C CXX ASM) # Add CXX here#...target_sources(${CMAKE_PROJECT_NAME} PRIVATE #... Core/Src/App.cpp # Add your cpp sources here Core/Src/Device.cpp)#...And config your clangd to avoid some problems:
nvim .clangdCompileFlags: CompilationDatabase: build Add: - -std=c++20 - --target=arm-none-eabi - -mcpu=cortex-m3 - -DSTM32F103xE - -fno-rtti - -fno-exceptions - -fno-threadsafe-statics # project headers - -ICore/Inc - -IDrivers/STM32F1xx_HAL_Driver/Inc - -IDrivers/CMSIS/Device/ST/STM32F1xx/Include # toolchain C++ headers - -isystem - /usr/arm-none-eabi/include/c++/14.2.0 - -isystem - /usr/arm-none-eabi/include/c++/14.2.0/arm-none-eabi - -isystem - /usr/arm-none-eabi/include/c++/14.2.0/backward - -isystem - /usr/lib/gcc/arm-none-eabi/14.2.0/include - -isystem - /usr/lib/gcc/arm-none-eabi/14.2.0/include-fixed - -isystem - /usr/arm-none-eabi/includeNote: This configuration is based on my personal setup. Some paths (especially toolchain and C++ standard library directories) may differ on your system, so please adjust them accordingly.
Make a script to build automatically
nvim build.shchmod +x build.shHere’s mine, you can use it freely. Remember to modify PROJECT_NAME, INTERFACE_CFG, TARGET_CFG variables’ value to yours.
#!/bin/bash
# Required Packages:# arm-none-eabi-gcc# arm-none-eabi-newlib# arm-none-eabi-binutils# cmake ninja# stlink openocd# gdb-arm-none-eabi
set -e
ROOT_DIR="$(cd "$(dirname "$0")" && pwd)"BUILD_DIR="$ROOT_DIR/build"
TOOLCHAIN_FILE="$ROOT_DIR/cmake/gcc-arm-none-eabi.cmake"
# Customize these variables for your projectPROJECT_NAME="stm32-practice"INTERFACE_CFG="interface/stlink.cfg"TARGET_CFG="target/stm32f1x.cfg"
# Color definitions (pacman style)RED='\033[1;31m'GREEN='\033[1;32m'YELLOW='\033[1;33m'BLUE='\033[1;34m'CYAN='\033[1;36m'BOLD='\033[1m'NC='\033[0m' # No Color
# Pacman-style output functionsprint_action() {    echo -e "${GREEN}::${NC} ${BOLD}$1${NC}"}
print_progress() {    echo -e "${BLUE}==>${NC} $1"}
print_warning() {    echo -e "${YELLOW}==> WARNING:${NC} $1"}
print_error() {    echo -e "${RED}==> ERROR:${NC} $1"}
print_success() {    echo -e "${GREEN}==> SUCCESS:${NC} $1"}
print_info() {    echo -e "${CYAN}==> INFO:${NC} $1"}
# Function to build projectbuild_project() {    local build_type=$1    print_action "Building $build_type version..."
    mkdir -p "$BUILD_DIR"    cd "$BUILD_DIR"
    print_progress "Running CMake..."    cmake -G Ninja -DCMAKE_TOOLCHAIN_FILE="$TOOLCHAIN_FILE" -DCMAKE_BUILD_TYPE="$build_type" ..
    print_progress "Running Ninja..."    ninja
    print_success "Build complete!"}
# Function to flash the binaryflash_binary() {    print_action "Flashing binary to device..."
    if [[ ! -f "${BUILD_DIR}/${PROJECT_NAME}.elf" ]]; then        print_error "Binary not found. Please build first."        exit 1    fi
    print_progress "Starting OpenOCD..."    openocd -f "$INTERFACE_CFG" -f "$TARGET_CFG" \        -c "program ${BUILD_DIR}/${PROJECT_NAME}.elf verify reset exit"
    print_success "Flash complete!"}
# Function to debugdebug_project() {    print_action "Starting debug session..."
    if [[ ! -f "${BUILD_DIR}/${PROJECT_NAME}.elf" ]]; then        print_error "Debug binary not found. Please build debug version first."        exit 1    fi
    print_progress "Starting OpenOCD daemon..."    openocd -f "$INTERFACE_CFG" -f "$TARGET_CFG" &    OCD_PID=$!
    sleep 1
    print_progress "Starting GDB session..."    arm-none-eabi-gdb "${BUILD_DIR}/${PROJECT_NAME}.elf" \        -ex "target remote :3333" \        -ex "monitor reset halt" \        -ex "layout src"
    # Clean up    print_progress "Cleaning up..."    kill $OCD_PID 2>/dev/null || true    print_success "Debug session ended."}
# Function to show build informationinfo_project() {    print_action "Project Information"    if [[ -f "${BUILD_DIR}/${PROJECT_NAME}.elf" ]]; then        print_progress "Binary size information:"        arm-none-eabi-size "${BUILD_DIR}/${PROJECT_NAME}.elf" | tail -n +2
        local build_type=$(grep CMAKE_BUILD_TYPE "${BUILD_DIR}/CMakeCache.txt" 2>/dev/null | cut -d= -f2 || echo "Unknown")        print_info "Build type: $build_type"        print_info "Binary location: ${BUILD_DIR}/${PROJECT_NAME}.elf"    else        print_warning "No binary found. Build the project first."    fi}
# Function to clean everythingclean_project() {    print_action "Cleaning build directory..."    if [[ -d "$BUILD_DIR" ]]; then        rm -rf "$BUILD_DIR"        print_success "Clean complete!"    else        print_warning "Build directory does not exist."    fi}
# Function to show statusstatus_project() {    print_action "Project Status"    if [[ -d "$BUILD_DIR" ]]; then        print_info "Build directory exists: $BUILD_DIR"        if [[ -f "${BUILD_DIR}/${PROJECT_NAME}.elf" ]]; then            print_success "Binary exists: Yes"            print_info "Last modified: $(stat -c %y "${BUILD_DIR}/${PROJECT_NAME}.elf" 2>/dev/null || echo "Unknown")"            local build_type=$(grep CMAKE_BUILD_TYPE "${BUILD_DIR}/CMakeCache.txt" 2>/dev/null | cut -d= -f2 || echo "Unknown")            print_info "Build type: $build_type"        else            print_warning "Binary does not exist"        fi    else        print_warning "Build directory does not exist"    fi}
# Function to show helpshow_help() {    echo "Usage: $0 [OPTION]"    echo ""    echo "Main Options:"    echo "  -S           Build Release version and flash (default)"    echo "  -S[SUB]      Build with sub-options"    echo "  -Q[SUB]      Query operations (status, info)"    echo "  -D           Debug only (no build)"    echo "  -C           Clean build directory"    echo "  -h           Show this help message"    echo ""    echo "Sub-options for -S:"    echo "  -Sr         Build Release only (no flash)"    echo "  -Sd         Build Debug only (no flash)"    echo "  -Sf         Flash only (no build)"    echo "  -Sg         Build Release and flash (same as -S)"    echo "  -Sdd        Build Debug and debug session"    echo ""    echo "Sub-options for -Q:"    echo "  -Qs         Show project status"    echo "  -Qi         Show build information"    echo ""    echo "Examples:"    echo "  $0 -S       # Build Release and flash (default)"    echo "  $0 -Sr      # Build Release only"    echo "  $0 -Sd      # Build Debug only"    echo "  $0 -Sf      # Flash only"    echo "  $0 -Sdd     # Build Debug and debug"    echo "  $0 -D       # Debug only (no build)"    echo "  $0 -Qs      # Show status"    echo "  $0 -Qi      # Show info"    echo "  $0 -C       # Clean"}
# Parse main optionscase "${1:-"-S"}" in    "-S")        # Default: build Release and flash        print_action "Build Release and flash"        build_project "Release"        flash_binary        ;;    "-Sr")        print_action "Build Release only"        build_project "Release"        ;;    "-Sd")        print_action "Build Debug only"        build_project "Debug"        ;;    "-Sf")        print_action "Flash only"        flash_binary        ;;    "-Sg")        print_action "Build Release and flash"        build_project "Release"        flash_binary        ;;    "-Sdd")        print_action "Build Debug and debug"        build_project "Debug"        debug_project        ;;    "-D")        print_action "Debug only"        debug_project        ;;    "-Qs")        status_project        ;;    "-Qi")        info_project        ;;    "-Q")        # Default query: show status        status_project        ;;    "-C")        clean_project        ;;    "-h")        show_help        ;;    *)        print_error "Invalid option: $1"        echo ""        show_help        exit 1        ;;esac
With the script, building, flashing and debugging(you need to learn how to debug with gdb) is extremely easy now:
./build -S # Build release & Flash./build -Sr # Just build release version./build -Sdd # Build debug & Flash & DebugMake a blink
Everything is prepared. Why not make a blink project?
Add the following files step by step:
#pragma once
#ifdef __cplusplusextern "C" {#endif
#include <stdbool.h>
void App();
#ifdef __cplusplus}#endif
This provides the declaration of App() function where we will write our own applications, and it should be called by the main function in main.c.
#pragma onceclass Device {public: void delay(uint32_t ms); uint32_t getTick(); void light(uint8_t x);private:};This provides the declaration of class Device, to provide interfaces to control our device. For now, it’s very simple and has only some basic functions.
Now let’s implement the definition:
#include <cstdint>#include "stm32f1xx_hal.h"#include "Device.h"#include "main.h"
void Device::delay(uint32_t ms) {  HAL_Delay(ms);}
uint32_t Device::getTick() {  return HAL_GetTick();}
void Device::light(uint8_t x) {  HAL_GPIO_WritePin(LED_1_GPIO_Port, LED_1_Pin, x & 0b1 ? GPIO_PIN_SET : GPIO_PIN_RESET);}
Then we can write a simple program to blink the LED in the App() function:
#include <cstdint>#include "App.h"#include "Device.h"
void App() {  Device device;  while (true) {    device.light(0);    device.delay(1000);    device.light(1);    device.delay(1000);  }}
And call it in the main.c:
/* ... *//* Private includes ----------------------------------------------------------*//* USER CODE BEGIN Includes */#include "App.h"
/* USER CODE END Includes *//* ... */int main(void){  /* ... */  /* USER CODE BEGIN 2 */  App();
  /* USER CODE END 2 */
  /* Infinite loop */  /* USER CODE BEGIN WHILE */  while (1)  {    /* USER CODE END WHILE */
    /* USER CODE BEGIN 3 */  }  /* USER CODE END 3 */}/* ... */
Now we’ve finished the coding part. You can ./build -Sr to check whether you can build it normally or not. If you use my script, you will see ==> SUCCESS: Build complete! if you build successfully.
Flash and go
Connect to your board through STLink or other tools:
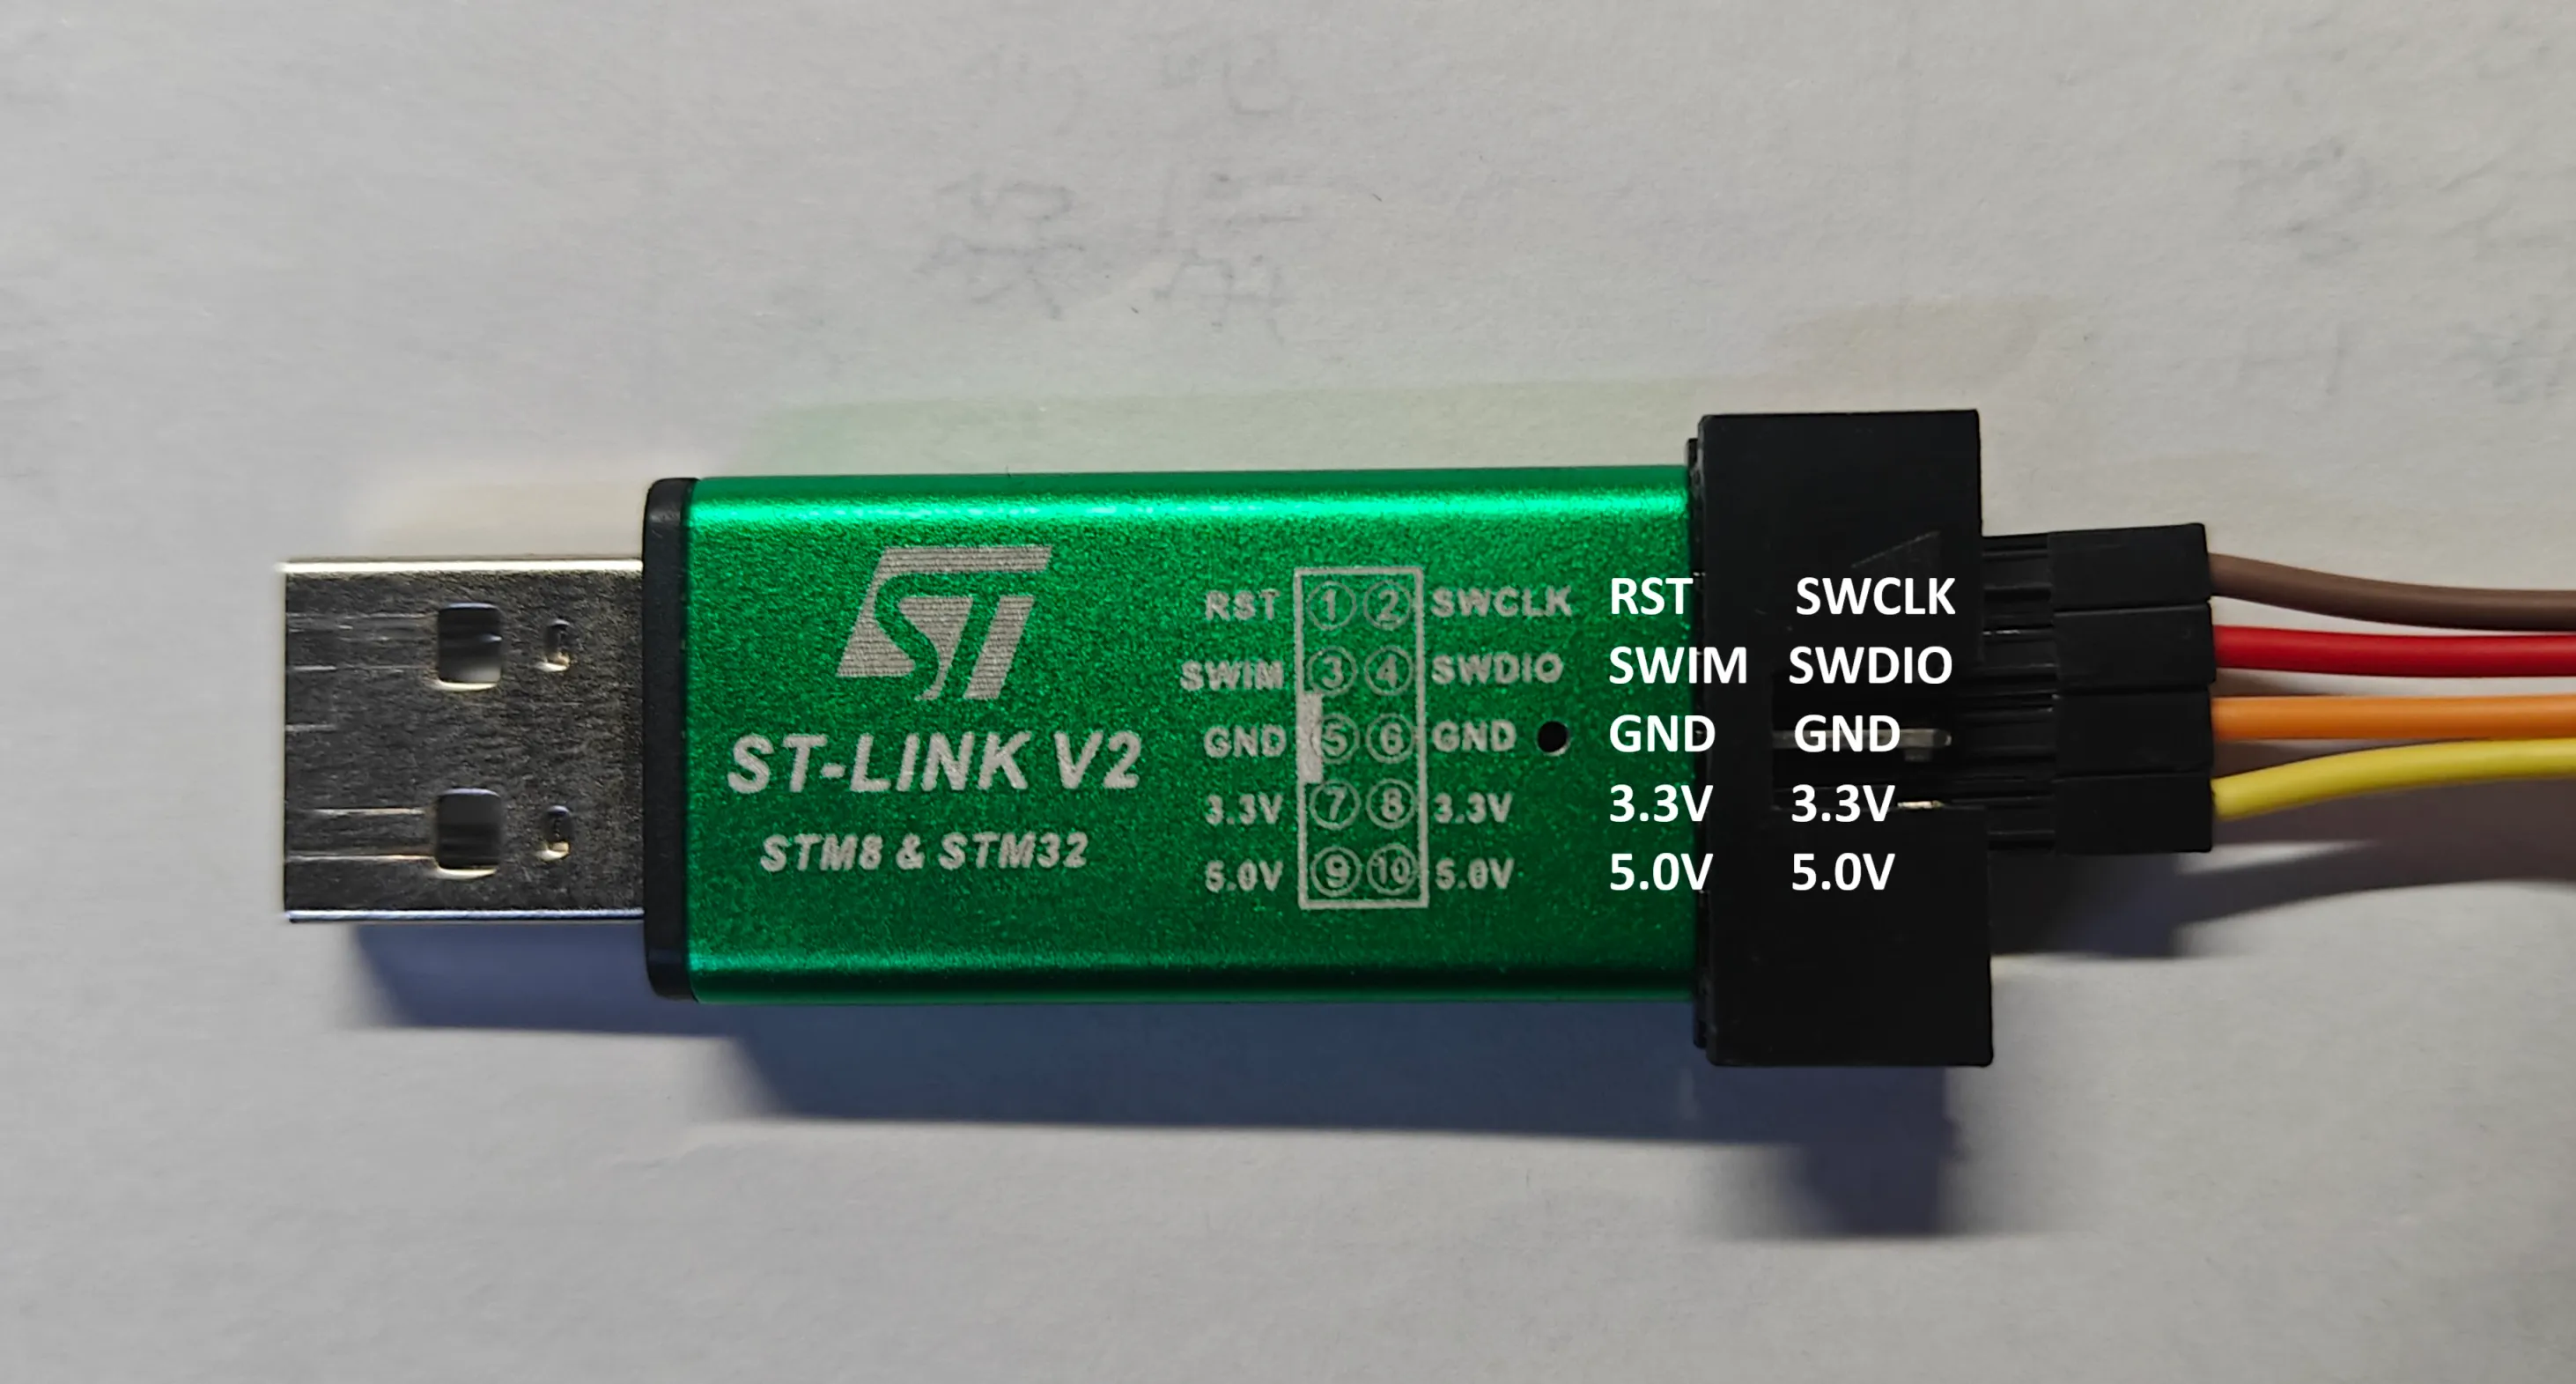
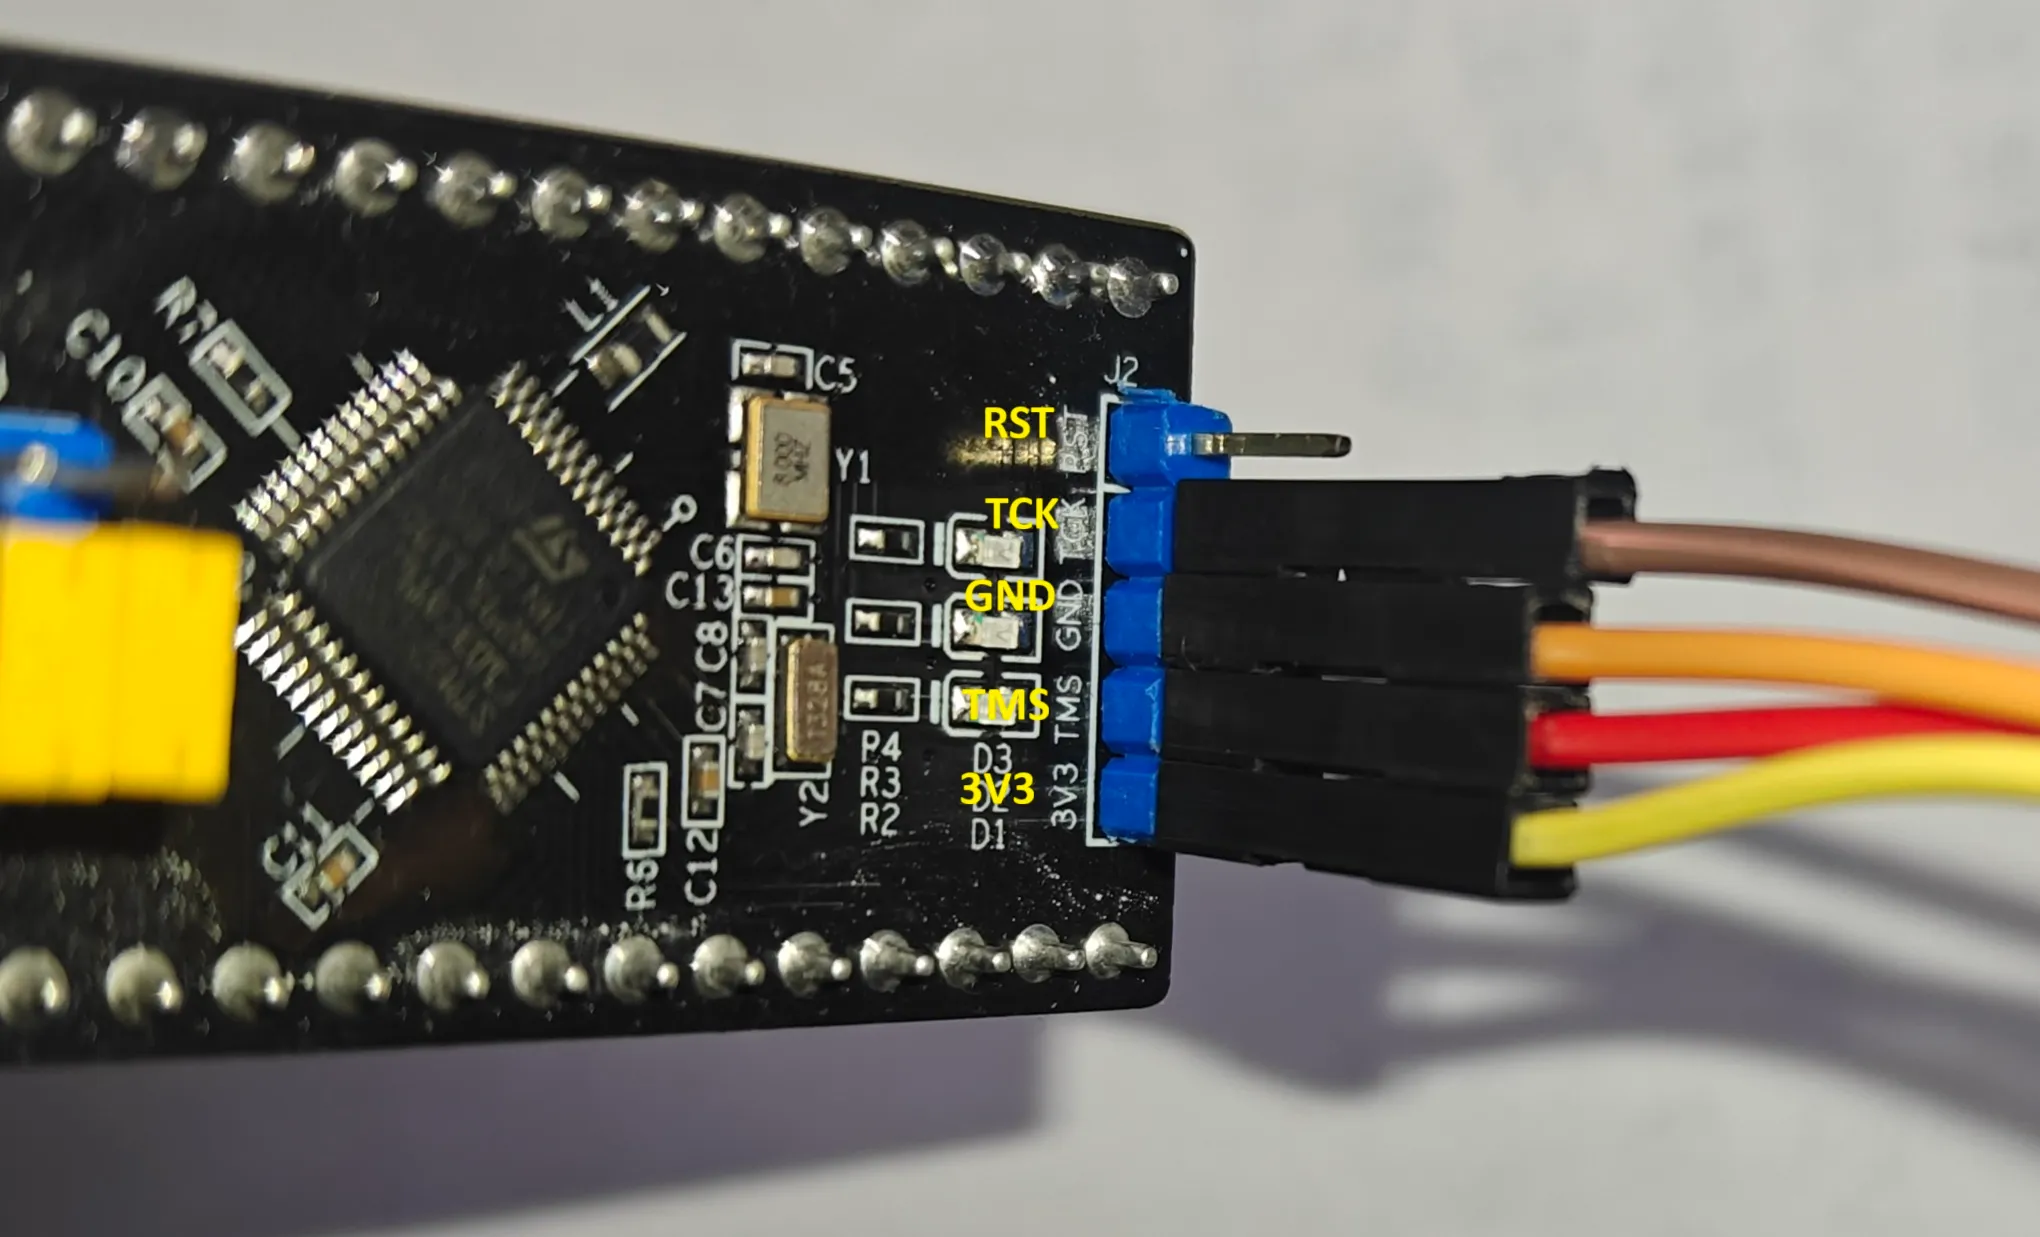
Make sure you connect the ports correctly. Now, use ./build -S to build and flash the program to your board. If everything goes well, you will see the LED is blinking! Congratulations and welcome to the world of embedded development.